Showing posts with label Windows Tips and Tricks. Show all posts

Shrink Partition (Shrink Volume)

1. Log on as an Administrator.
2. Go to Control Panel > System and Maintenance > Administrative Tools > Computer Management. You can also open the Computer Management application by using the Computer context menu. Select Computer Management.


In fact, you can go directly to the Disk Management MMC snap-in by typing diskmgmt.msc in the Start's search box or on the Run command.


If you're prompted for an administrator password or confirmation, type the password or provide confirmation.

3. Expand the Storage section, and in it go to the Disk Management console.


4. Select the disk you want to shrink, for example Drive C.

5. Right-click the disk and select Shrink Volume.


6. Process will take a few moments, while the system is looking at the partition structure. Note that it would be best to make sure that that partition was properly defragmented prior to trying to shrink it.


7. When calculation is done, the UI will display the largest amount of space that can be trimmed from the selected partition. Please note, again, that this size is related to the actual amount of free space on that partition (i.e. you cannot shrink more that there is free space), and the amount of file fragmentation on that partition.


Enter the amount in MB and click on the Shrink button.


8. The process will finish quite quickly, and a reboot is NOT required. You can notice the new partition size. Also note that you now have a remaining unused part on the hard drive.


Configure And Use UEFI In Windows 8.1

The traditional and famous ‘BIOS’ firmware interface of Windows has been replaced by the powerful UEFI in  Windows 8. UEFI, Unified Extensible Firmware Interface,  is a specification that defines an interface between operating system and the computer hardware.
It has CPU independent architecture and CPU independent drivers. It also defines a ‘boot manager’ that has the boot configuration details and loads the operating system along with necessary drivers. It can access all the devices, peripherals and even the internet access of your system.

UEFI changes the way your System boots

BIOS was a limited specification with limited code space with 16-bit code. However, today’s intensive processing needs are met by faster processors like 32 or 64-bit CPUs. And so, an interface was needed that can take advantage of  the advanced techniques. BIOS boots by reading a sector in the hard disk that further located the additional code and executes it. In contrast, UEFI loads the .efi program files that are stored in a partition of the hard disk, called ‘EFI System Partition-ESP’. These EFI programs can utilize EFI boot and run-time services.

Secure Boot

Secure boot feature requires a ‘digital signature’ of boot loaders which in turn requests signature of kernels, drivers and services; hence it becomes difficult for malware authors to insert their code into the pre-boot process. This improves the overall security of the system, keeping the Operating System safe and secure from being corrupted by unauthentic services and drivers .

UEFI can boot from larger drives

UEFI uses the GUID Partition Table (GPT) that uses 64-bit entries in its table which makes UEFI capable to boot from drives larger than 2 TiB of storage. Note that BIOS can only address up to 1MB of address space using the Master Boot Record table.
Unlike BIOS, UEFI has a friendly and comparatively, colorful interface. In Windows 8.1 or Windows 8, you can access advanced options of UEFI as follows:
  1. Press Win+C to open the charms bar.
  2. Go to Settings -> Change PC settings.
  3. Select the General tab.
  4. Scroll down and under ‘Advanced Startup’ , click ‘Restart Now’.
  5. This will restart your system and takes you to the Advanced Startup options.
  6. Select ‘Troubleshoot’ option.
windows8 advanced options
If you have a single Operating System on your computer then you will see ‘Use a Device’ option instead of ‘Use another operating system’. It will allow you to  boot your computer from removable media  such as USB drive, CD/DVD drive, SD card, network boot, and so on (depending on your computer system).
If you only wanted to view the interface or entered the UEFI by mistake, select ‘Continue’ to safely continue to your regular boot without making any changes in the settings. In case, you need to ‘Refresh’ or ‘Reset’ the PC settings :
  • Select Troubleshoot -> Refresh your PC.
  • Or Select Troubleshoot-> Reset your PC.
Note that you can also Refresh/Reset your PC from inside the windows:
  • Go to Settings -> Change PC settings -> Select the General tab -> Scroll down to see the Refresh/Reset options.
windows 8 trouble shoot
Enter the Advanced option screen and now, you need to be careful about your every click and selection because it is going to effect the way your system boots up.
System Restore, as the name says, it restores your system to the last good configuration known. If you want to recover from an image file, select System Image Recovery. Or if you are less techie, simply go for an Automatic Repair.
windows 8 advanced settings
You can enter the command prompt mode by selecting ‘Command Prompt’ from the ‘Advanced options’ screen. It will prepare command prompt for you and asks for the credentials too before you access the command prompt. If you want to quit the command mode, type ‘exit’ in the command prompt and hit ‘Enter’.
To access the UEFI Firmware Settings, which are the closest thing available to the typical BIOS setup screen, select Start up/UEFI Firmware Settings. It will display a list of options. However you need to restart your system to make any changes. With the Start up Settings Screen, you can do the following tasks:
  • Enable debugging
  • Enable boot logging
  • Enable low resolution video
  • Enable safe mode
  • Enable safe mode with networking
  • Enable safe mode with command prompt
  • Disable driver signature enforcement
  • Disable early launch anti malware protection
  • Disable automatic restart on system recovery
  • Launch recovery environment
‘Driver signature enforcement’ and ‘Early launch anti malware protection’ refers to the ‘Secure Boot’, so disabling them means disabling Secure Boot.
We have tried to take a smooth ride of the UEFI options and its booting process along with the possible options to play with the system settings. If you have any query or confusion, don’t hesitate to post it in the comment box below.

Windows 8 Boot Loader Screen Options And Usage

The Microsoft has revamped its boot loader for the new Operating System, Windows 8. The new boot loader is touch enabled. You can select the Operating System to boot by touching. But you will be able to see the new screen when you dual boot Windows 8 with another Windows Operating system e.g Windows 7.
With the Windows 8 boot loader, Microsoft has completely changed the way Operating System is loaded. If you are installing Windows 8 in dual boot mode for the first time, you will think that you can not login to Windows 7 as whenever you start your computer the new boot screen of Windows 8 starts first.
First look at Windows 8 boot loader
After a few seconds you are given the option to choose an Operating System on your computer.
Dual Boot Menu Windows 8 and Windows 7
The next thing is more strange because when you try to login to Windows 7 by clicking or touching Windows 7 Icon, your computer will restart and then boot into Windows 7 automatically. If you login to Windows 8 then your computer will not restart and will directly boot into Windows 8.
The new boot loader also comes with many new options.  You need to click Change defaults or choose other options to open options.
Windows 8 boot loader options
Microsoft has integrated recovery tools into the boot loader (In Windows 7 Recovery Tools could be available with the setup DVD only). Click on Troubleshoot icon.
In the Troubleshoot interface, you have the option to Refresh, Reset your PC.
Refresh your PC reserves all your favorite settings, documents, photos, Metro apps and more.  Windows is reinstalled in this way so that any damaged files are now replaced.
With Reset your PC all the data is wiped out of your computer and clean install is available on your computer.
Windows 8 Troubleshooting interface
Click on Advanced Options and you will have another options for system recovery e.g.  restore system with System Restore or with System Image file.
Windows 8 boot menu advanced options interface
You also use the command prompt if you know some commands for troubleshooting.
All in all Microsoft’s new boot loader is more useful than their traditional boot loaders of Windows Vista and Windows 7.

Windows 8 or 8.1 In Safe Mode

Safe mode is a diagnostic operation mode in Windows that has been used over years to troubleshoot the PC problems. It is a limited state of computer in which only those files, settings and drivers are loaded that are necessary to run Windows. Windows 8 and Windows 8.1 have introduced new ways to start Windows in Safe Mode. Although there are several other methods, in this article we will discuss four ways to start Windows 8 and Windows 8.1 in Safe Mode.
Safe mode offers three modes: Safe Mode, Safe Mode with networking and Safe Mode with Command Prompt.  ’Safe mode with Networking’ is similar to safe mode but also loads the needed services to give network connectivity. In case you don’t need an internet connection and the desktop or task-bar does not load properly in the Safe Mode, it is recommended to start it in the ‘Safe Mode with Command Prompt’.
Start Windows8 in safe mode
There are some ways to start your system in the Safe mode. You may use any of the following way, that suits your need.

Start Windows 8/8.1 in Safe Mode Using PC Settings

  1. Press Win+C to open the charms bar.
  2. Go to Settings -> Change PC settings.
  3. Select the General tab.
  4. Scroll down and under ‘Advanced Startup’ , click ‘Restart Now’.
  5. This will restart your system and takes you to the Advanced Startup options.
  6. Select ‘Troubleshoot’ option.
  7. Click Advanced options -> Startup Settings -> Restart.
  8. On the Startup Settings screen, choose the desired safe mode option.

Start Windows 8/8.1 in Safe Mode Using System Configuration

  1. Press Win+R and type ‘msconfig’ or use search open of the charms bar to open ‘MsConfig’.
  2. Select the ‘Boot’ tab.
  3. You will notice all the safe mode options are listed there. Select the required one.
  4. Hit ‘Apply’ and ‘Ok’.
  5. When you restart your PC, it will boot up in the safe mode.
Start Windows8 in safe mode

Using Shift and F8 Keys to Boot into Safe Mode

The above mentioned methods work when you are already logged into Windows in normal mode. What if the system does not even boot up? The use of F8 keys to open the Advanced start-up options has been trivial. Due to introduction of new boot loader in the Windows 8 to cut the start-up time, F8 alone does not work in the Windows 8. However, if you hold down the ‘Shift’ key and tap the F8 key, you will be able to access the Advanced Boot options. Note that this may need a few tries.
Start Windows8 in safe mode

Using the Choose an Operating System Screen

If you have installed multiple operating systems on your machine and it asks for a while, every time before it boots, to choose the Operating System: this may become helpful at times. Actually, this is the screen from where you can directly access the troubleshooting options without the need of any restart or trials of  ’Shift +F8 ‘.
  1. When it shows Choose an Operating system screen, select ‘Change defaults or other options’.
  2. Now it will display the same ‘Choose an option screen’ (discussed above).
  3. Follow the same steps afterwards (i.e. ’Troubleshoot’ ->Advanced options ->Startup Settings -> Restart->Safe mode)
Start Windows8 in safe mode
If the PC works properly in the Safe Mode, it means there’s nothing wrong with the core settings, files and drivers of your PC. You may open all apps one by one, to see which application or program is being malicious. However, if your PC malfunctions in the Safe Mode, you may need to reset your PC. You can always reset your system to the factory settings by following the steps below:
  1. Press Win+C to open the charms bar.
  2. Go to Settings -> Change PC settings.
  3. Select the General tab.
  4. Scroll down and under ‘Refresh your PC without affecting your Files , click ‘Get started’.
  5. Or Scroll down and under ‘Remove everything and reinstall Windows’ , click ‘Get started’.
Start Windows8 in safe mode
Microsoft should not have buried the ‘Safe Mode’ in the long list of steps, but you can not help it. All we can do is to expect that newer version of Windows come up with quick access to Safe Mode.
Mostly Safe Mode is used by power users. What method do you use to open your Windows 8 or Windows 8.1 in Safe Mode? Were you more comfortable with the previous OS like Windows 7, Windows Vista or Windows XP which had different ways to go to Safe Mode or the newer methods introduced in Windows 8 and Windows 8.1.

USB 3.1 New Design, Features And Specifications

The Universal Serial Bus (USB) has become a  defacto standard for hot pluggable devices. By using a USB port, you can easily plug-in a device without turning off your system. The USB device will get detected automatically after being plugged in. This capability was first introduced in Apple’s FireWire ports but the USB standard more popular and widely adapted and used.
The design of standard USB port has been the same from the beginning. USB 1.1 became very popular and then came USB 2.0 standard which was faster than USB 1.1. Most recently, USB 3.0 standard is being used in most modern devices which promises visible performance improvements over its predecessor. Let’s discuss about what are future plans after USB 3.0.


Usb_connectors

What is Type-C Connector?

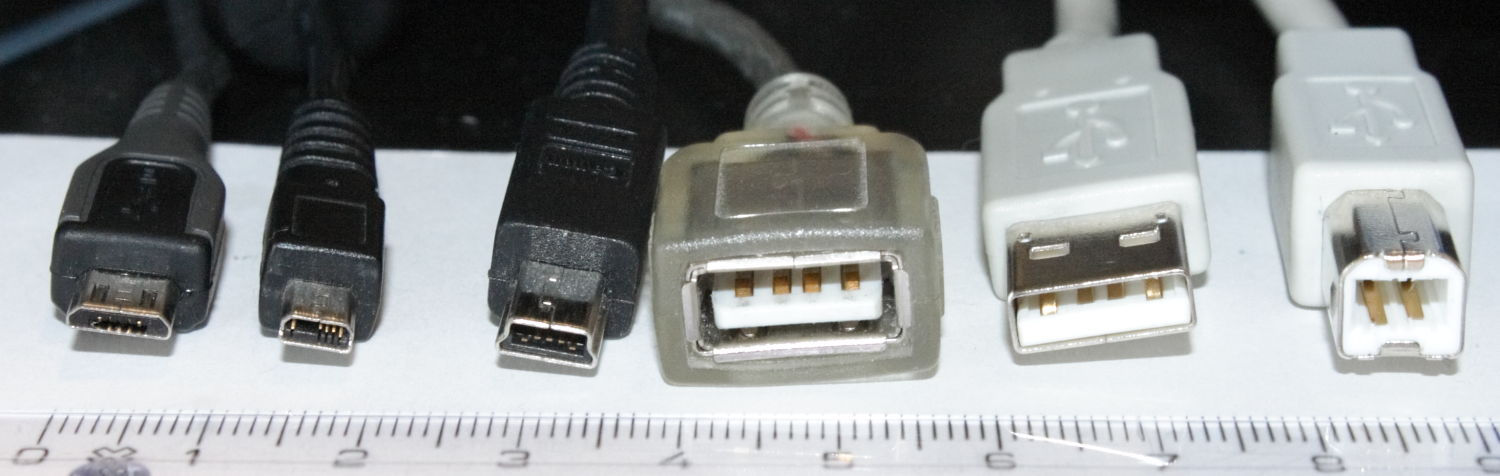
There are two major types of USB connectors, type A connector and type B connector. Type A is the most used connector which we see in our computers and laptops by default. It comes in rectangular shape. Type B connector is a square connector.
USB Connectors Type A and Type B
Type A and Type B connectors are further divided into standard, mini and micro connectors.
Mini and Micro USB Type A and Type B Connectors
With the passage of time, the need for a new connector type has arisen which will be able to meet requirements for smaller devices. The problem with USB ports and connectors is that they can only be plugged in one direction. If a user plugs in opposite, the connector will get damaged. The new specification of USB connector is called Type C connector which is still being designed. It will get rid of this limitation of one directional plugging in of USB devices. Type C connectors will be bidirectional meaning that the user will be able to plugin in the USB cable without it being straight or upside down.

Features of USB 3.1

According to the new announcement by USB.org, the USB 3.1 connectors will include the following features:
  1. An entirely new design which will feature bidirectional plugging in of USB devices so that the user doesn’t need to take care of which way the USB cable is being plugged in.
  2. USB 3.1 will be smaller than the current standards being used for USB. This will enable slimmer and sleeker product designs of USB enabled devices.
  3. Type C connector and cable will support scalable power charging.
  4. Scalability – the connector design will scale for future USB bus performance.
Unfortunately there is not photo available of USB 3.1 connectors and cables. The new design of USB 3.1 should be available by the end of 2014. We have high hopes that the new USB design and specification will open a new era for USB powered devices. You can get more information on this USB 3.1 design from the PDF files here and here.

USB Device Not Recognized In Windows

USB ports and devices are used everywhere. There are multiple USB ports in a computer meaning that you can connect multiple USB devices to your computer. In fact, you can connect 127 devices to a USB port through extensions. Sometimes USB devices start giving problems like they don’t get recognized or start malfunctioning.
USB device not recognized error
On my laptop, I have a mouse and a keyboard installed in the USB ports. I usually get the USB device not recognized error whenever the power source of the laptop is disturbed. Usually the mouse will malfunction. Although the mouse’s light keeps powered on but the cursor doesn’t move on the screen. Here are some ways of fixing unrecognized USB problem.

Unplug the USB device

In many cases, the easiest fix is to unplug the USB device from the computer USB port and then plug it again. This will just refresh the connection and if there is any problem with the connection, it will be resolved by this method.

Shutdown, unplug and start again

If unplugging the USB device doesn’t work, then you should shut down the computer. If the mouse and the keyboard, both are on USB and are not working then you can just plug the power cable so that the computer shuts down of power failure. Otherwise, you should properly shutdown the computer and plug off the power cable for a few minutes to make sure that the power to all parts of the computers goes out.
After a few minutes, plug the power cord again and turn on the computer. This should, in most of the cases, solve the problem.

Uninstall and then install the USB devices again

If the two methods discussed above do not solve the USB not recognized or malfunctioning problem then you should proceed with this final method. In this method, we will uninstall the USB drivers completely and then try to plug in the device for a fresh install of USB drivers. To uninstall the USB device drivers, follow the steps below:
  1. Go to Run –> devmgmt.msc to open the device manager. If you are using Windows 8, you can use Windows Key + X + M shortcut key to open the device manager.
  2. Under “Universal Serial Bus Controllers”, right click and uninstall any device listed with a yellow exclamation sign. The exclamation sign indicates that the USB device driver of the device connected to that particular USB controller has malfunctioned or is not being recognized.
  3. Once you have uninstalled the USB device driver, you should restart the computer and plug the device again. This will start installing the device driver automatically.